How to Make Raw Milk Cheese at Home, According to an Expert Farmer

Beth Dougherty, co-author of ‘The Independent Farmstead,’ shares beginner-friendly tips and a recipe—plus why your cheese won’t taste like anyone else’s.
How to Make Raw Milk Cheese at Home, According to an Expert Farmer
Homemade farm gouda produced by The Sow's Ear farm. (Beth Dougherty)
6/26/2024
Updated:
6/26/2024
0:00
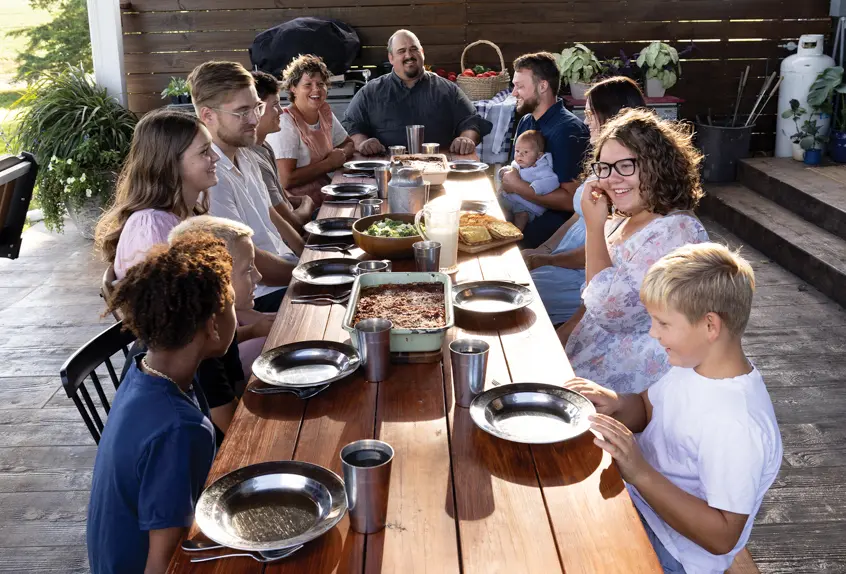
Beth Dougherty likes to joke that she started making cheese about five minutes after she and her husband, Shawn, started getting milk from their first Jersey heifer in 2001. With 5 gallons a day coming into their kitchen, storage space was at a premium.

“By day three, there was no room in the refrigerator,” Mrs. Dougherty said.

Having grown up around conventional agriculture, Mrs. Dougherty was no stranger to the abundance of dairy production. However, she and her husband were far from conventional farmers.

In 1996, they purchased 16 acres of what Ohio deemed “land unsuitable for agriculture.” Over the next 25 years, they proved this designation to be wrong. The couple developed a model of traditional farmstead self-sufficiency that made the land thrive. Through rotational grazing, pasture management, and creative economic solutions, they not only eliminated the need for off-farm resources, but created an abundance for their large family.

The dairy cow was pivotal to the success of their method. With its milk, the Doughertys could feed their eight children, and their chickens and pigs—and still have enough left over to make butter and cheese.

Shawn and Beth Dougherty have been farming together since the 1980's. They live in eastern Ohio, where they manage 90 acres of land. (Landon Troyer)
Cows spring pasture on The Sow’s Ear farm. (Beth Dougherty)

Early Challenges

Mrs. Dougherty’s early cheesemaking efforts were not without hurdles. What frustrated her most was that she couldn’t find the kind of farm-scale cheesemaking information she needed.

“In 2001, there were no good cheese books to be found. The ones that were available were all full of instructions that required that you have litmus paper and titration units, and that you purchase factory-produced, isolated, single-strain lactobacillus cultures,” she said.

What she discovered was that cheesemaking writ large had been taken over by the big dairy industry. She couldn’t find any step-by-step information on how to produce cheese at home without specialized equipment.

“So, when people wanted to learn how to make cheese, they didn’t flip to page 56 of ‘Little House in the Big Woods’ to see how Ma made cheese in the description, which is a very good description. Instead, they looked to the industry,” said Mrs. Dougherty.

All of the books’ recipes attempted to reproduce two things that don’t work in the average kitchen: lab-standard conditions, and universal cheeses that have no connection to place. Cheese is, by its very nature, a highly local product.

All of the famous cheeses you’ve ever eaten are the results of a local terroir. They came from a place whose environment and agricultural practices dictated the eventual flavors of the cheese. So, when you eat a piece of cheddar, you’re tasting something that was developed in a certain part of England using the local soil and grass, a specific set of habits to feed and milk the cows, and specific cheesemaking tools.

Mrs. Dougherty came to believe that the mistake she made, and that many other beginner cheese makers make, was to try and replicate factory cheese in her own kitchen. What she should have been doing, and what she now encourages others to do, was create an all-natural cheese based on her own kitchen environment.

The Jungle in the Kitchen

For a long time, however, Mrs. Dougherty continued to battle her kitchen’s natural conditions.

“I was trying to get more and more control over this process, because things wouldn’t go according to the book,” she said.

Eventually, out of what she chalks up to sheer laziness, she stopped trying to impose order on her cheese. Then, the order came naturally.

“Cheese wants to happen on its own,” she said. Raw milk is already cultured, meaning the lactic bacterial strains necessary for the fermentation process already exist, so you don’t have to add factory cultures. “All you’re going to make are slight adjustments to the process to nudge the cheese in directions you like. And you can do it anywhere.”

Making cheese at home doesn’t require a clinical laboratory. The heating, cutting, washing, setting, and aging of the curds can all be done in the comfort of your own kitchen without specialist equipment. The process is almost exactly the same as making sourdough bread. Sourdough is a living product with a temperament and flavor of its own. Similarly, your homemade cheese is shaped by all of the natural bacteria, yeast, and fungi that already live in your kitchen.

This microscopic jungle is active 24/7, but is most obviously present once you begin to make cheese in earnest. When you first start to bring raw milk into your kitchen, its lactobacillus probiotic bacteria are the newcomers on the bacteria block. They interact with the native bacterias and molds that want to set up shop in the milk. Those microorganisms come into conflict with the lactobacilli, outnumbering it and causing a number of issues during countertop culturing, such as floating curds (coagulated milk solids), off-putting smells, and mold growth.  These early batches can be discarded or given to dairy loving livestock, like pigs and chickens.

But the more milk you bring into your kitchen, the more the beneficial lactobacilli will multiply, and eventually outnumber the other molds and bacteria. In the end, you’ll reach a point of balanced coexistence between the milks lactobacilli, and the bacteria, yeasts, and molds that love your home. They’re helpful, not harmful, and create wholly unique cheeses.

Once this happens, you can begin to make cheese that “will never be like anybody else’s,” said Mrs. Dougherty.

Ready to Try It Yourself?

Beginner cheesemakers don’t need any special equipment to make cheese. All that’s required are raw milk, rennet, salt, and a pot.

“A thermometer was the most complicated piece of equipment we used,” said Mrs. Dougherty.

As far as books are concerned, Mrs. Dougherty recommends “The Art of Natural Cheesemaking” by David Asher. It’s a radical departure from the industry standard books she’d read earlier on. Instead, it operates from the viewpoint that cheese is a product of place.

“It’s excellent. It’s beautiful. It’s delightful to read, and it’s an education. It will change the way you think about milk and prepare your mind to think about life, nature, and existence differently,” she said.

She stresses the importance of abandoning the concept of what cheese is “supposed to be.” Once you embrace the natural method, it frees you up to experiment and gain the confidence that tells you: “Yes! I can do this.”

RECIPE: The Sow’s Ear Basic Gouda

Some cheeses are better for beginners; Mrs. Dougherty points people towards a gouda method as a starting point.

“It’s a washed cured method, which means you can do the whole thing by only heating water in your kettle,” she said. The curds shrink and warm slowly in a single pot.

Mrs. Dougherty wrote of the method: “The cheesemaker finds herself, at nine-thirty in the morning, with the breakfast dishes done, a five-pound cheese in the press, and time to call her mother, help people with their math lessons, and hang a load of laundry.”

A Note on Raw Milk: The kind of cheese Mrs. Dougherty makes requires raw, unpasteurized milk to produce. However, since the national average price for a gallon of raw milk ranges upwards of $10, she understands that you’re probably not going to be making natural raw cheese on a regular basis.

However, if you have access to a milk source, either from your own cow or through a deal with neighbors, you’re going to be able to source milk more affordably. Without access to raw milk, you’re better off buying cottage-style, small-scale cheese from a local producer. You can still make cheese with purchased raw milk; it’s just not going to be incredibly cost-efficient.

For those concerned about using raw milk, Mrs. Dougherty stresses that the product almost cannot become pathogenic because the probiotics that are naturally present make the milk inhospitable to pathogens. Even the USDA admits that raw milk that has been aged for at least 60 days is safe for people to consume.

A Note on Equipment: Once your curds are properly firm, they need to be hooped and pressed so they will ‘knit’—that is, pack and form a single mass. No special equipment is needed for this process. An easy cheese hoop can be made by drilling holes in a clean, straight-sided plastic tub or bucket; a gallon bucket should be big enough to hold the curds from three or four gallons of milk. To press the curds, you’ll need a ‘follower’, a weighted form. For this, use a second tub or bucket of the same size and shape and fill it with warm water.
  • 1 gallon raw milk (see Note above)
  • 1 ounce live-culture yogurt
  • Rennet (amount according to package directions)
  • Salt
  • Large stock pot
  • Colander or wire strainer
  • Knife
  • Thermometer
  • Tea kettle
  • Cheese hoop and follower (see Note above)
  • Water
  • Kosher salt
Setting Your Curds:

Warm your milk and yogurt culture to 90 degrees. (If you’re using whole milk that has not been homogenized, check to see if the cream has risen; if it has, you’ll want to skim the cream and warm the cream and milk separately, then recombine.)

Dilute rennet in water (2 ounces per gallon of milk is about right.)

Add the diluted rennet to the warm milk, and use a slotted spoon to mix in an up-and-down motion. Mix for only a few seconds; too long and your curds will be broken. (Note: avoid spiral stirring to keep curds from cracking.)

Cover your pot, wrap it with towels, and set it aside for 45 minutes

Check for a “clean break”: Insert your finger into the pot at an angle, then lift it straight out. If the curds are fully formed, they’ll break cleanly over your finger, leaving few or no blobs of milk; this means your milk is ready for the next step. If you don’t have a clean break, cover the pot and wrap it up again, and give the milk another 15 minutes before you check again. It sometimes takes an hour or more to get a clean break!

Cutting Curds:

Put a kettle of water on the stove to heat—you’ll need it soon!

Using a long, sharp kitchen knife, make parallel slices all the way across the pot, about 3/4-inch apart, until all the curd is sliced.

Turn the pot 90 degrees, and make a second set of parallel slices, perpendicular to the first set, making a checkerboard pattern.

Use your knife to make sideways cuts across the pot at levels approximately 3/4-inch apart, to produce rough 3/4-inch cubes. (Don’t worry that it’s not perfect; just try to get pieces of about the same size.) Now you have a pot of small curds! They’ll begin shrinking right away, releasing their clear, yellowish whey.

Let these curds rest for 5 minutes to firm up.

Once firm, use your bare hand to constantly stir the curds gently from top to bottom for about 5 more minutes. (This is the time to break up any overly large curds you find.)

Warming Curds:

Begin adding hot water from your kettle, a cup or two at a time, stirring between additions and checking the temperature until it reaches 93 degrees. (Note: Bare hand stirring is always best; it’s easiest on the curds.)

Cover the pot and let it rest for 15 minutes. Refill and reheat the kettle if necessary.

After 15 minutes, begin adding more hot water at the same rate, stirring until the curds reach 103 degrees F.

If at any time your pot is getting too full, dip out some of the whey/water to make more room. You can save the whey for feeding pets or livestock, to water the garden, or to heat up your compost pile.

Continue to stir constantly for 10 minutes.

Cover the pot, rewrap it to keep it warm, and let the curds ‘pitch’ (rest in the whey) for 30 minutes.

Test your curds to see if they are ready to be hooped and pressed. A properly cooked curd will squeak when you bite it, and have the firmness of the white of an over-easy egg.

If your curds aren’t ready after 30 minutes, recover your pot and check them every 15 minutes until they reach the appropriate firmness.

Important: Curds must be kept warm, between 100 to 103 degrees F, to cook properly; if they cool too much, add some warm water to increase the temperature.

Hooping Curds:

Soak a clean muslin dish towel in the whey in your pot and use the towel to line your cheese hoop. Set the cheese hoop in the sink or over a large pan or tub.

Gently scoop the curds into the towel; a small colander or wire strainer will make a good scoop, or you can just use your hands.

When all the curds are in the form, carefully fold the corners of the dish towel over them.

Place the follower bucket, half-filled with hot water, on top of the muslin-covered curds. Whey will run out of the holes in the cheese hoop.

Allow the curds to press for about 15 minutes.

Remove the follower from the hoop and invert the hoop to remove the newly-forming cheese.

Unwrap the cheese, turn it over, and return it to the hoop.

Fill the follower 3/4-full of hot water and press the cheese again, this time for 20 minutes.

Remove, invert, and rewrap the cheese again, this time filling the follower completely with hot water.

Flip, rewrap, and press the cheese two or three more times to remove any excess liquid. Try to arrange the muslin as smoothly as possible, to avoid deep ridges in the cheese.

Leave the cheese and follower in the press overnight at room temperature.

Brining the Cheese:

Bring three gallons of water to boil in a large pot.

Add kosher salt, stirring, until no more will dissolve. Turn off the heat and allow the brine to cool.

Remove the cheese from the press and unwrap it carefully.

Float it in the brine solution, sprinkling the exposed top of the cheese with a thin layer of salt. Cheese is generally brined for about three hours per pound of cheese; this can vary with your taste preferences and with the shape of the cheese.

Turn the cheese an hour or two before you remove it from the brine; this will wash the salt crystals from the previously exposed side of the cheese.

Remove the cheese from the brine and place it on a wooden board to dry. Turn it several times a day until the cheese is completely dry.

Aging and Storing the Cheese:

The ideal conditions for aging hard cheeses are generally considered to be about 55 degrees F and 75 percent humidity. If you can’t manage these conditions, don’t worry. A basement shelf will work just as well as a cheese cave in the French countryside. You can also age cheese in your refrigerator by placing it in an open Ziploc bag and putting it in one of the fridge drawers.

“It’ll take a little longer, but it will cure,” said Mrs. Dougherty.

Wherever you store your cheese, try and turn it once a week. If mold forms, wipe it off with a cloth dipped in salt water, or another potable liquid of your choice, such as wine, coffee, or beer.

Don’t let the mold worry you. It doesn’t hurt your cheese. Mrs. Dougherty knows this is true because she accidentally neglected cheese for a summer. Basement temperatures bounced between 68 and 75 degrees Fahrenheit. It got extremely moldy, but all she had to do was wipe it down and slice away some of the rind.

“It was delicious!” she said.

You can always trim off any mold before you eat your cheese. You can eat this cheese young, but more complex flavors will develop with aging. Recommended aging for this cheese is 2 to 12 months.

Ryan Cashman is a writer, father, husband, and homesteader. He lives in the foothills of southwestern New Hampshire with his wife and three children.
Related Topics