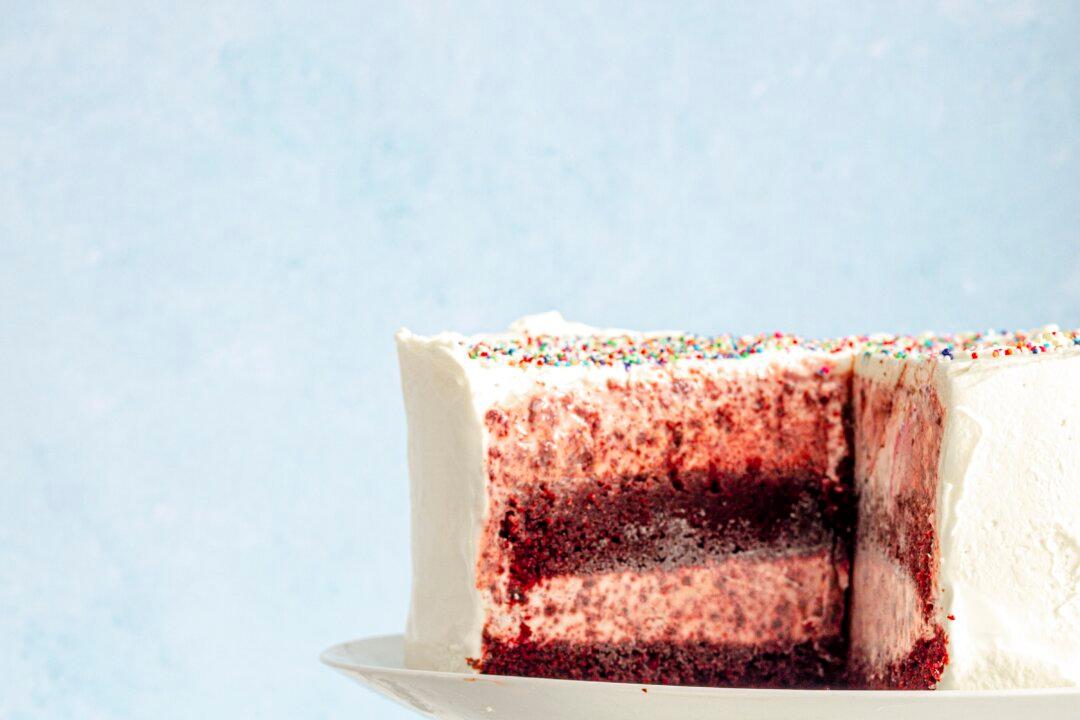
Upon moving to America, it took me a second to understand and appreciate red velvet cake. I’ve never experienced a cake or any dessert whose “flavor” and the name solely depend on the addition of artificial food coloring. Once you look beyond its color, though, it’s a mild-tasting chocolate cake with a truly velvet texture.
This American classic slathered with cream cheese frosting is often served during summer holidays like the Fourth of July. I wanted to create a version of this cake that is more refreshing and appropriate for those hot days. That’s why we’re turning that sticky, sweet cream cheese frosting into light, creamy ice cream!
What Kind of Ice Cream Goes With Red Velvet Cake?
You can use store-bought ice cream, but my no-churn cream cheese ice cream is more delicious and easier to deal with. Have you tried softening store-bought ice cream for cakes? It’s a messy endeavor: It melts, loses volume and air, and creates icy results. This base is streamlined and as quick as making whipped cream. Plus, it’s made with cream cheese, mimicking the tang and nostalgia associated with red velvet cake.
Is Red Velvet Cake Actually Just Chocolate Cake?
Red velvet cake is a mild chocolate cake traditionally made with natural cocoa powder, one that hasn’t been “Dutch-processed” to change its acidity and reddish color. That acid reacts with baking soda, which helps leaven the cake and gives it this rusty red color. The bright red color of red velvet cake is a modern interpretation made possible by the invention of edible and flavorless food dyes. Contrary to tradition, I opt to use Dutch-processed cocoa powder in this recipe for its deeper, more robust chocolatey flavor. It also makes for a more sophisticated, muted color in combination with red food coloring.
What Is the Red Flavor in Red Velvet Cake?
This is a great question, and it is up for debate, as everyone perceives it differently. To me, the flavor of red velvet cake is sweet, mildly chocolatey, and milky from cultured buttermilk. Although I think red velvet cake is not so much about flavor as it is about a very moist, soft, and fine crumb that creates the most velvety texture.
Red Velvet Ice Cream Cake
Serves 12
For The Cake
- Cooking spray
- 1 3/4 cups granulated sugar
- 1 1/2 cups buttermilk
- 3/4 cup neutral oil, such as canola or avocado
- 1 tablespoon vanilla extract
- 1 tablespoon red food coloring
- 1 1/2 teaspoons kosher salt
- 2 1/2 cups all-purpose flour
- 1/3 cup Dutch-processed cocoa powder
- 1 1/4 teaspoons baking soda
For the Ice Cream
- 8 ounces cold full-fat cream cheese
- 1 (14-ounce) can sweetened condensed milk
- 1/2 medium lemon
- 2 cups cold heavy cream
- 1 teaspoon vanilla extract
For The Frosting And For Serving
- 1 cup cold heavy cream
- 8 ounces cold full-fat cream cheese
- 1/4 cup powdered sugar
- 1 teaspoon vanilla extract
- Sprinkles, to decorate (optional)
Make the Cake
1. Arrange a rack in the middle of the oven and heat the oven to 350 F. Line two (9-inch) round cake pans with parchment paper and lightly coat the paper and sides with cooking spray. Place on a rimmed baking sheet.
2. Place 1 3/4 cups granulated sugar, 1 1/2 cups buttermilk, 3/4 cup vegetable oil, 1 tablespoon vanilla extract, 1 tablespoon red food color, and 1 1/2 teaspoons kosher salt in a large bowl. Whisk until creamy and bright red.
3. Place 2 1/2 cups all-purpose flour and 1/3 cup Dutch-processed cocoa powder in a medium bowl and whisk to combine.
4. Add 1 1/4 teaspoons baking soda to the sugar mixture and whisk to combine. Immediately add the flour mixture and mix with a rubber spatula until it forms batter, about 10 seconds. (Some small lumps are OK, but there should be no visible white flour spots.) Divide the batter evenly between the cake pans.
5. Bake, still on the baking sheet, until the cakes are slightly domed, spring back when lightly pressed in the center, and a toothpick inserted in the centers comes out mostly clean with just a few crumbs, about 35 minutes.
6. Transfer the cake pans to a wire rack. Let the cakes cool in the pans for 15 minutes. Run an offset spatula or thin knife around the cake edges, then flip the cakes out onto the rack top side down. Let cool completely. Meanwhile, make the ice cream.
Make The Ice Cream
1. Place 8 ounces cold cream cheese and one can of condensed milk in the bowl of a food processor fitted with the blade attachment. Process until well blended, about 1 minute.
2. Squeeze the juice from 1/2 medium lemon until you have 1 tablespoon. Add the lemon juice, 2 cups cold heavy cream, and 1 teaspoon vanilla extract to the food processor. Process until thick and the consistency of whipped cream, about 3 minutes. Transfer to a large bowl, cover with plastic wrap, and refrigerate until ready to use. Wash and dry the food processor.
Assemble the Cake
1. When the cakes are cooled, flip them over. Trim the tops with a large serrated knife so the cakes are level. Transfer the scraps from the trimmed tops to the food processor. Pulse in 2-second intervals until fine crumbs form, 4 to 5 pulses. Add the crumbs to the ice cream base and gently fold until combined.
2. Line one (9-inch) round cake pan with plastic wrap, covering the bottom and the sides and allowing a 5-inch overhang on either side. (Alternatively, use 10-inch high acetate sheets on the sides of the pan.)
3. Place one cake layer in the pan. Top with half of the ice cream mixture and spread into an even layer. Top with the second layer and remaining ice cream mixture. Cover with plastic wrap and freeze overnight.
4. If the freezer is set very cold and the cake is frozen solid, let the cake sit for 15 minutes at room temperature to soften slightly. Meanwhile, make the whipped cream frosting.
Make the Frosting
1. Place 1 cup cold heavy cream, 8 ounces cream cheese, 1/4 cup powdered sugar, and 1 teaspoon vanilla extract in the bowl of a food processor fitted with the blade attachment. Process until firm peaks form, stopping and scraping down the sides of the bowl every minute, about 4 minutes total.
2. Transfer the cake to a serving platter and unwrap. Frost all over with the whipped cream and decorate with sprinkles if desired. Slice and serve!
Recipe Notes
Cocoa powder substitution: Regular, natural cocoa powder can be used in place of Dutch processed. Natural cacao powder will give a lighter red color but will produce a fluffier and dryer cake crumb.
Buttermilk substitution: If you don’t have buttermilk on hand, you can use 3/4 cup milk plus 3/4 cup plain yogurt or sour cream.
Make ahead: The cakes can be baked, wrapped well when cooled, and refrigerated for up to three days or frozen for up to three months. The ice cream base can be made and refrigerated for up to 4 hours before assembling the cake.
Storage: Leftover ice cream cake can be frozen in an airtight container or wrapped well in plastic wrap for up to one week.
Miro Uskokovic is a contributor to TheKitchn.com, a nationally known blog for people who love food and home cooking. Submit any comments or questions to [email protected]. Copyright 2023 Apartment Therapy. Distributed by Tribune Content Agency, LLC.