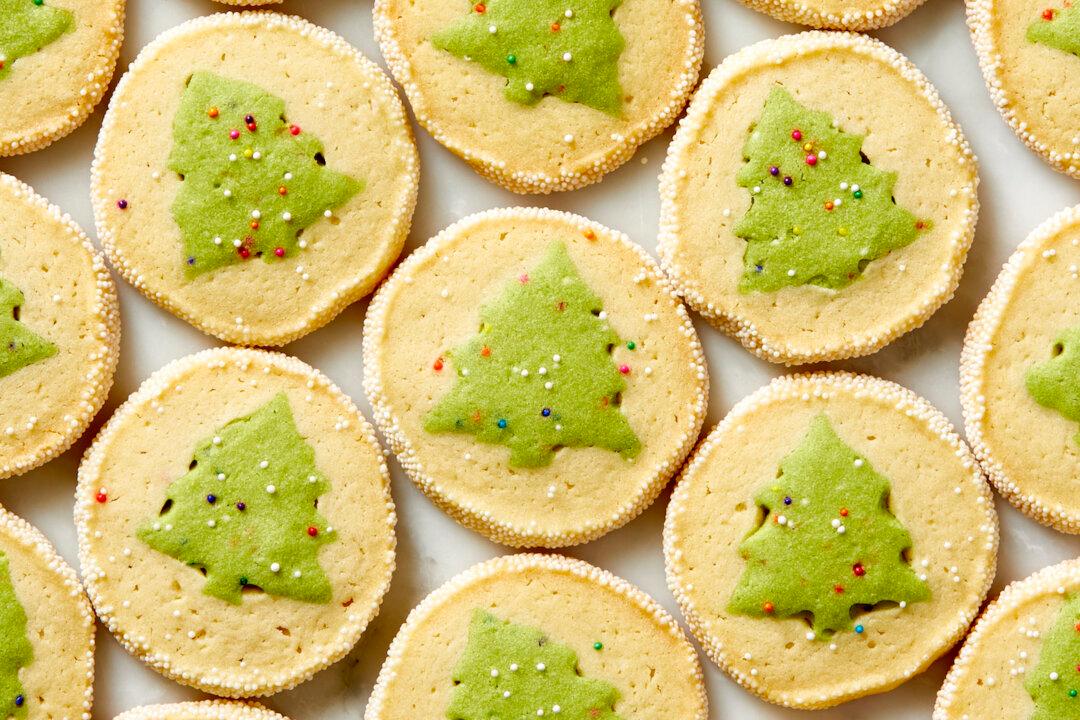
These nostalgic slice-and-bake snow globe cookies immediately bring back joyful holiday memories. My family didn’t do a lot of home baking when I was growing up, so grabbing a tube of the iconic sugar cookie dough from the grocery store was always considered a treat—I honestly still have a sweet spot for them.
Being the over-achieving home baker that I am now, making these homemade slice-and-bake cookies is such a satisfying and spirited holiday baking project! Slicing into the dough to reveal a festive snowy Christmas tree decked out with twinkly lights will impress not only yourself, but also all your friends when you tell them the cookies didn’t come out of a package.
These cookies are buttery and tender with a sweet crunch from a generous coating of snowy sprinkles. While the cookies might look complicated, the assembly process is actually quite simple. They just require patience, freezer space, and a lot of sprinkles! In order for the holiday tree in the center to keep its iconic shape, the sturdy shortbread dough must be cold, so clear some room in your freezer for the dough to properly chill. You can prepare the dough in advance, then slice and bake when you’re ready, making them a convenient addition to your holiday preparations.
- Don’t rush the process. Because the dough chills in stages, you can pause at any point during the process if you need to.
- Reach for a cutter with sharper edges. A Christmas tree cookie cutter with sharper edges will help the design stay more defined, as opposed to using one with rounded edges.
- Experiment with different shapes. Use this technique for assembling slice-and-bake cookies with different holiday-inspired shapes in the center to get creative this season.
Snow Globe Cookies
Makes 20 (2.5-inch) cookies- 2 sticks (8 ounces) unsalted butter
- 1/2 cup granulated sugar
- 1/2 teaspoon kosher salt
- 1 large egg
- 1 teaspoon vanilla extract
- 2 1/4 cups all-purpose flour, plus more for rolling
- 2 teaspoons matcha powder, or 3 to 7 drops green gel food coloring
- 2 tablespoons colorful pearl sprinkles, such as India Tree Christmas Past or Seurat, plus more for sprinkling
- 1/2 cup plus 3 tablespoons white pearl sprinkles (at least 3 ounces), such as India Tree String of Pearls, divided
1. Place 2 sticks unsalted butter in the bowl of a stand mixer (or large bowl if using an electric hand mixer) and let sit at room temperature until softened. Add 1/2 cup granulated sugar and 1/2 teaspoon kosher salt. Beat with the paddle attachment on medium speed until light and airy, 60 to 90 seconds.
2. Add 1 large egg and 1 teaspoon vanilla extract, and beat until the egg is fully incorporated, about 1 minute. Add 2 1/4 cups all-purpose flour and beat on low speed until a crumbly dough forms. Transfer about 2/3 of the dough (about 2 cups) to another bowl.
3. Add 2 teaspoons matcha or 2 to 7 drops green gel food coloring to the remaining dough in the stand mixer. Beat on low speed until the dough is uniformly green, about 30 seconds. Add 2 tablespoons colored pearl sprinkles and beat on low speed just until combined.
4. Transfer the dough to a sheet of plastic wrap and form the dough into a 1-inch-thick disc. Wrap the dough up tightly in the plastic wrap. Freeze until firm but still pliable, about 45 minutes. Meanwhile, add 3 tablespoons of the white pearl sprinkles to the uncolored dough and mix with a flexible spatula until the sprinkles are well-distributed. Cover and let sit at cool room temperature.
5. Unwrap the green dough and place on a sheet of parchment paper. Roll out until 1/2-inch thick. Using a small (about 1 1/2-inch) Christmas tree cookie cutter, cut out as many trees as you can. Gather the scraps, roll out again, and cut out more trees (discard any scraps after this). Stack the trees on top of each other and gently press them together so they stick. Transfer the stack to a small baking sheet or plate and freeze until very firm, about 30 minutes.
6. Tear the plain dough into chunks. Press the chunks around the stack of green dough (sides, top, and bottom) so it is completely covered. Turn the stack on its side and roll it back and forth on the counter to form a log. Pour the remaining 1/2 cup white pearl sprinkles onto a plate or small baking dish, then roll the log in the sprinkles until the outer layer is fully covered (no need to do the ends).
7. Wrap the log in plastic wrap or parchment paper and freeze until firm, 20 minutes. Meanwhile, arrange a rack in the middle of the oven and heat the oven to 350 F. Line two baking sheets with parchment paper or silicone baking mats.
8. Unwrap the dough and slice the dough crosswise into scant 1/2-inch-thick cookies. Arrange the cookies on the baking sheet, spacing them at least 1-inch apart, 10 per sheet. Sprinkle some more of the colorful pearl sprinkles onto the trees.
9. Bake one sheet at a time until the edges of the cookies are lightly golden-brown, 12 to 15 minutes. Let the cookies cool on the baking sheet for a few minutes. Transfer to a wire rack and let cool completely.
Recipe Notes
Make ahead: The cookie dough log can be made and rolled in sprinkles up to one week ahead. Wrap tightly in plastic wrap and refrigerate. Slice and bake when ready. Alternatively, the wrapped dough log can be frozen for up to one month; thaw in the refrigerator for a few hours before slicing and baking.
Storage: The baked cookies can be stored in an airtight container at room temperature for up to one week.