Making Summer Fruit Pies Isn’t as Hard as You Might Think

Making a pie crust is often intimidating but with this recipe, it doesn’t have to be.
Making Summer Fruit Pies Isn’t as Hard as You Might Think
The secret to any fruit pie is to chill it well after assembly and before baking. (JeanMarie Brownson/TNS)
Updated:
0:00

Every year, our family spends a summer week or two in a cabin along the eastern shores of Lake Michigan. I’m not sure if we go more for the incredible sunsets or the fruit pies we enjoy afterward nearly every evening.

In preparation, I ensure our rental has a decent oven, pack my oversized rolling pin, a couple of pie pans and a box of instant tapioca along with the beach towels. We hit the local farm stands for fruits as soon as we arrive.

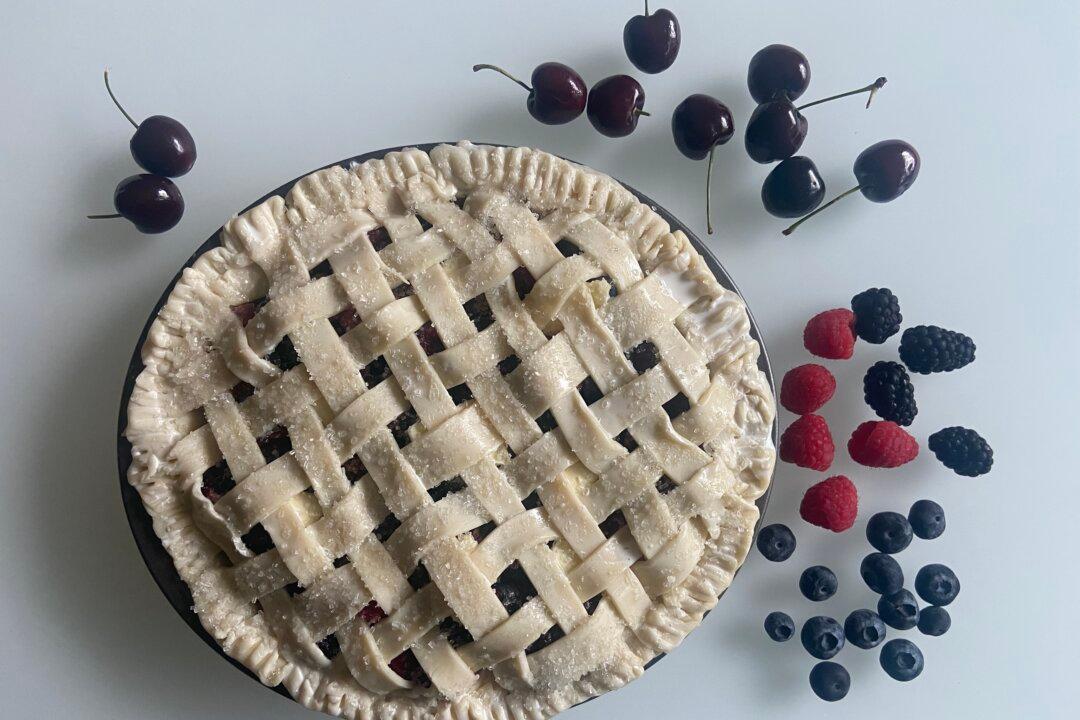
Making summer fruit pies need not be intimidating. Berry pies prove easiest because there’s so little fruit prep to do. Berries just need to be stemmed, briefly rinsed and patted dry. Adding a few sweet cherries to the berries boost texture and sweetness, simply pit and halve them, working over the sink.

To ensure a perfectly juicy pie filling, but not runny, employ a bit of starch to bind the juices. Instant tapioca, such as Kraft Minute Tapioca, is my favorite pie thickener; it is virtually tasteless and results in a clear pie filling. Look for it in the pudding aisle of large supermarkets. Buy two boxes—it keeps well and is great in apple pies come fall. Cornstarch works nearly as well and is easier to find. Flour can make the fruit filling appear cloudy, so I generally don’t use it for fruit fillings.

Never hesitate to make a pie because you fear pie crusts. I often rely on refrigerated or frozen ready-to-roll pie crusts. Look for brands with the least amount of ingredients; Trader Joe’s frozen pie crusts are among my favorites for good taste and flaky baked texture. The trick to working with these prepared crusts is to follow package directions for thawing or warming before shaping them into the pie pan.

Unroll the crust and place it between sheets of waxed paper and roll it out with a rolling pin into a slightly thinner crust. This is the time to repair any tears in the crust as well. Then carefully lay the rolled dough into the pie plate. Ease it in, as the experts say, to prevent stretching the dough which can cause it to shrink during baking.

Most fruit pies benefit from a top crust of some sort—either a full sheet of dough, strips of dough in a lattice arrangement or pieces of dough cut into various shapes and layered over the filling. The top crust traps moisture to allow the fruit to cook through and the juices to thicken.

Check out the myriad informative videos online for assembling a lattice-topped pie. The strips can be thick or skinny, you choose. You can weave the dough strips or simply lay them across one another on a diagonal or perpendicular. If a lattice crust is beyond your comfort level, simply top the fruit filling with the rolled-out top crust; seal the edges and pierce the top in several places to allow steam to escape.

The secret to any fruit pie is to chill it well after assembly and before baking. I clear out freezer space and pop it in there for 20 minutes while I preheat the oven. Alternatively, chill the pie for about 1 hour in the refrigerator, then bake.

This pie is best served warm the day it is made with a generous dollop of whipped cream or barely softened vanilla ice cream. Leftovers (really?) can be cut into serving pieces and warmed briefly in the microwave.

Triple Berry Cherry Pie

Serves 6 to 8; makes one 9-inch pie
  • 1 recipe pie crust for a double crust 9-inch pie, well chilled, see recipe
  • 2 cups blueberries, rinsed, patted dry
  • 2 cups halved, pitted dark sweet cherries
  • 1 cup raspberries, rinsed, patted dry
  • 1 cup blackberries, rinsed, patted dry
  • 2/3 cup sugar
  • 1/3 cup quick-cooking minute tapioca
  • 1/4 teaspoon salt
  • 2 tablespoons cold butter
  • 2 tablespoons half-and-half
  • Coarse sugar, for sprinkling
1. Have a 9-inch metal or glass pie plate and a baking sheet ready.

2. Roll out the larger disk of pie dough between two sheets of floured wax paper into a thin circle about 12 inches in diameter. Carefully fold the dough in half, then place it in the pie dish, Unfold it and fit it over the bottom and up the sides of the pie dish. Trim the overhang to leave about 1 inch all around the pie dish. Refrigerate.

3. Roll the other piece of dough between two sheets of floured wax paper into a 12-inch circle and place it (still between the wax paper) on the baking sheet and refrigerate it.

4. For the filling, put the blueberries, cherries, raspberries and blackberries into a large bowl. Add the sugar, tapioca and salt. Gently stir to mix. Let stand about 15 minutes.

5. Meanwhile, for the lattice top, use a ruler to help you cut even strips, skinny or wide, from the rolled out sheet of dough. I like to cut about 16 strips, each about 1/2 inch thick for a thin lattice top.

6. Spoon the berry-cherry mixture and accumulated juices into the dough-lined pie plate. Dot the top with little bits of butter. Carefully place half of the dough strips over the fruit, spacing them evenly apart. Then arrange the remaining dough strips over these, in a perpendicular pattern. Use your fingers to press together the edges of the lattice strips and the bottom crust, trimming as needed. Use a fork to make a decorative edge.

7. Freeze the assembled pie for 20 minutes or refrigerate for 1 hour.

8. Meanwhile, heat the oven to 400 degrees. When the pie is thoroughly chilled, brush the lattice strips and the pie edges with the half-and-half. Sprinkle everything generously with the coarse sugar.

9. Bake the pie at 400 degrees for 25 minutes. Reduce oven temperature to 350 degrees. Now slide a baking sheet under the pie to catch any drips. Continue baking at 350 degrees until the top crust is nicely browned, about 20 minutes more. Cool on a wire rack until barely warm.

10. Serve warm.

Pie Crust

Makes enough for a double-crust 9- or 10-inch pie
Note: We use vegetable shortening for easy dough handling and maximum flakiness; unsalted butter adds rich flavor.
  • 2 1/2 cups all-purpose unbleached flour
  • 1 tablespoon sugar
  • 1 teaspoon salt
  • 1/2 cup unsalted butter, very cold
  • 1/2 cup transfat-free vegetable shortening, frozen
1. Put flour, sugar and salt into a food processor. Pulse to mix well. Cut butter and shortening into small pieces and sprinkle them over the flour mixture. Use on/off pulses with the food processor to blend the fats into the flour. The mixture will look like coarse crumbs.

2. Put ice cubes into about 1/2 cup water and let the water chill. Remove the ice cubes and drizzle about 6 tablespoons of the ice water over the flour mixture. Briefly pulse the machine just until the mixture gathers into a dough.

3. Dump the mixture out onto a sheet of wax paper. Gather into two balls, one slightly larger than the other. Flatten the balls into thick disks. Wrap in plastic and refrigerate until firm, about 1 hour. (Dough will keep in the refrigerator for several days.)

Dear Readers: We would love to hear from you. What topics would you like to read about? Please send your feedback and tips to [email protected].
JeanMarie Brownson is a James Beard Award-winning author and the recipient of the IACP Cookbook Award for her latest cookbook, “Dinner at Home.” JeanMarie, a chef and authority on home cooking, Mexican cooking and specialty food, is one of the founding partners of Frontera Foods. She co-authored three cookbooks with chef Rick Bayless, including “Mexico: One Plate at a Time.” JeanMarie has enjoyed developing recipes and writing about food, travel and dining for more than four decades. ©2022 JeanMarie Brownson. Distributed by Tribune Content Agency, LLC.
Related Topics