How to Choose the Right Grow Lights for Your Indoor Plants

Whether you’re getting a jumpstart on seedlings or planting an indoor garden, grow lights can be a valuable tool for a gardener.
How to Choose the Right Grow Lights for Your Indoor Plants
LEDs start out more expensive but quickly pay back as they use less electricity and last considerably longer. IrinaPhVideo/Shutterstock
Updated:
0:00

Humans don’t like cold, wet, and dreary days, and plants don’t either. Seed catalogs may arrive in the mailbox, but a peek outside shows the growing season to be weeks or even months away.

For gardeners who want a jump start, grow lights fill the gap. They allow a gardener to start several dozens or even hundreds of seedlings early without them becoming pale or leggy. One can even plant an entire garden indoors.

However, grow lights can be expensive, and exploring the many options can quickly become overwhelming. But if, for example, you buy nursery plants every year to make the most of short growing seasons, the costs can be offset over time. Calculate how much you might save starting with seeds rather than nursery plants over the span of one, two, or five years, and use that as a basis for a grow light budget.

Another option is to start small and expand as needed over time. Also, there are some less expensive lighting options to consider. Let’s dive in.

Let’s Get Started

Grow lights are available in a wide variety of shapes and sizes. Some simplify the decision-making process by being integral. Good examples are the inexpensive seed starter kits on Amazon and eBay with integrated grow lights in the clear humidity dome cover. These lightweight plastic trays are an easy way to get started, and at $20 for a pack of five trays with 12 seed cells in each, it’s hard to say no to them. They typically feature either a two-inch lid or a four-inch lid, for taller seedlings. The idea is to place the light directly above and close to the plants for compact, upright growth. Some even feature a timer to automate turning the light on and off.

The next step up, particularly if one wants to grow indoors year-round, is to consider a personal indoor garden system. Tabletop or standalone, these systems feature integrated, full-spectrum LED grow lights that mimic the sun’s rays and work well to get a jump on this year’s seedlings. But since personal gardens typically have a higher light source that can cause leggy plants, it’s still best to start them in a seed starter kit with lower lights.

Since personal garden setups can allow certain plants to grow to maturity, they can be used to grow seasonal fruits, vegetables, herbs, and microgreens indoors after the spring seedlings are moved outside. They can even function as the sole garden if there’s no outdoor space. There are hydroponic options as well for those who want to garden indoors without soil, but that’s a subject for another article.

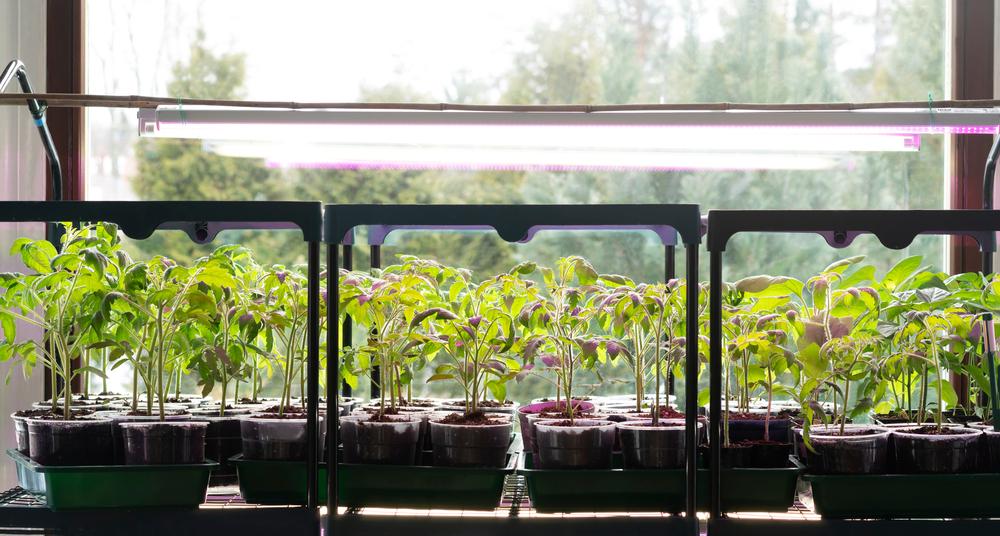
Grow lights should be placed directly over the seedlings so that they don't stretch toward the light.(EvgeniusD/Shutterstock)
Grow lights should be placed directly over the seedlings so that they don't stretch toward the light.EvgeniusD/Shutterstock

Bulbs, Bulbs, and More Bulbs

Most people who talk about grow lights are talking about the bulbs themselves, which are then used to configure an easy (or complex, if desired) do-it-yourself setup.

Grow lights come in a wide variety of shapes and sizes. There are bulbs that look like regular lightbulbs and fit in a standard lamp or socket; clip-on lights with flexible stems for easy positioning; flexible gooseneck-style lamps with multiple light rods; and shop light-style bulbs.

Whatever bulb is chosen, it needs to be positioned directly above the plants, or they will stretch toward the light and become leggy and weak. One common DIY configuration is to suspend shop light grow lights from a chain that can be lowered for new seeds and raised periodically to keep the lights close to the top of the plant as they grow. This can be as simple as some sprouting trays on a work table with a light hanging above or as fancy as a DIY multi-shelf unit with trays and lights on each level to grow more in a smaller footprint.

The New Kid

For decades, fluorescent bulbs were the go-to for grow lights. They were available as long tube shop lights, or CFLs (compact fluorescents), that fit a variety of growing spaces. Although they require less of an initial investment per bulb, they do cost more to run and have a shorter lifespan than LED. One benefit is that they provide warmth, which is useful for growing in cold climates.

Some budget-conscious growers swear that they get decent results by simply using regular shop lights—one warm and one cool in a double fixture. Note that light quality drops off on older tubes. If they’re getting dark near the ends, it’s time to replace them.

LEDs start out more expensive but quickly pay back as they use less electricity and last considerably longer. But where they really stand out is their technology. They are available in blue (for growth during the vegetative stage), red (for the flowering stage), and white, which is often referred to as “full spectrum” as it contains red, blue, and green. Top growers will have full spectrum light as their main source of light and add in blue during early growth stages, then red as the plants reach the flowering stage.

Remember, sufficient light is the secret to every healthy plant.

Grow Lights 201

Grow lights are designed to replicate the sun, and like the sun, they should not be looked into directly. Here’s some other advanced advice.

Intensive Growth

In general, the more light intensity, the better. In addition to the wattage, check out the PPF (photosynthetic photon flux) or foot candle rating. Most grow lights are in the 10 to 50 range, with higher-rated lights being better for seedlings.

Ideal Timing

Seedlings need a consistent 16 to 18 hours of light per day at an ideal temperature of 65 to 75 F. They also need a consistent period of darkness. To give them the best start, purchase an inexpensive programmable timer.

Clean and Bright

Grow lights should be cleaned regularly, especially in humid or dusty environments. For tube lights, use a wet rag while the lights are off and cool. For other styles, consider using a feather duster.
Sandy Lindsey
Sandy Lindsey
Author
Sandy Lindsey is an award-winning writer who covers home, gardening, DIY projects, pets, and boating. She has two books with McGraw-Hill.
Related Topics