My husband is an exceptional parent. I often feel like I should step it up and mother a bit harder—more kitchen table crafts, more Lego construction sessions on the carpet, exciting field trips to all the spectacular museums in the city—because he is always doing these things with the kids every chance he gets. He revels in it. It makes me look bad.
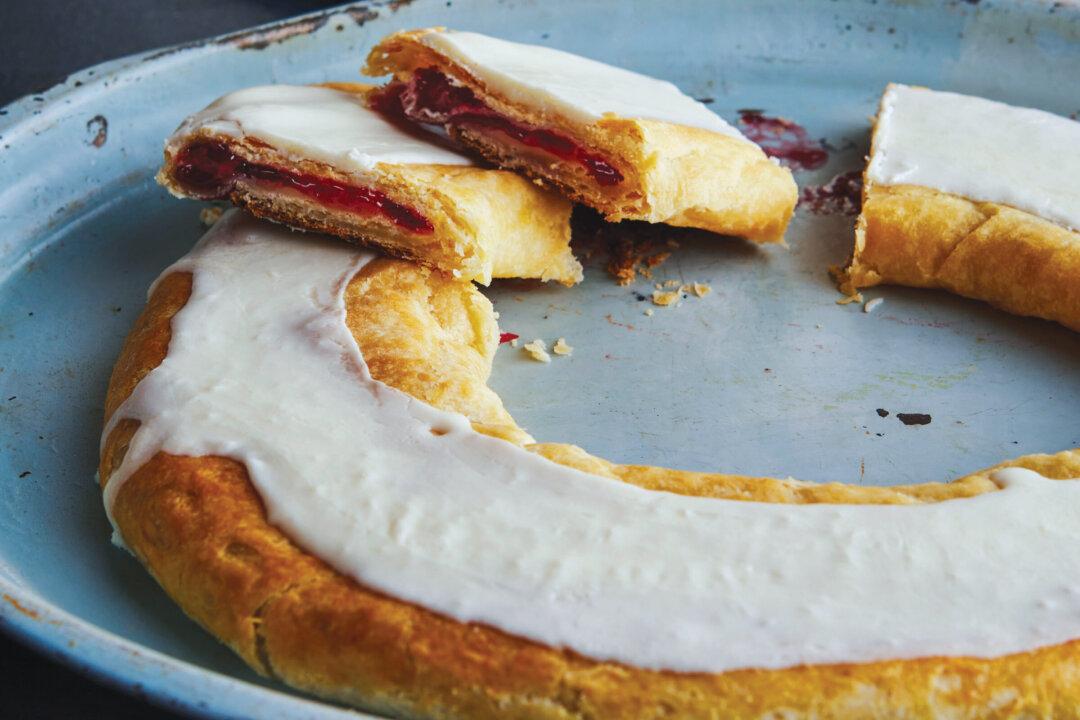
But at some point, I realized there are things I do with the kids that are extremely important to their personal development that he would never think to do. For instance, who was the parent who drove the older child all the way to Racine, Wisconsin, for a day trip we called the Kringle Krawl? And brought said child to four different bakeries in the city, all known for their kringle, to sample them all, grill the bakers at each place about their methods, and determine once and for all who makes the best dang kringle in all of Racine? It was not her father, I will tell you that right now. It was all me, exposing my child to the greatness of Wisconsin’s state pastry in a very scientific manner. Science, I tell you! Education! Artistry, history, and interpersonal skills! All wrapped into many, many layers of buttery pastry.
Makes 2 kringles
- 6 ounces (170 grams) almond paste (see Note)
- 4 tablespoons (57 grams) unsalted butter, at room temperature
- 1/4 cup (30 grams) confectioners’ sugar
- 2 tablespoons well-beaten egg white
- 1/4 teaspoon freshly squeezed lemon juice
- Pinch of fine sea salt
- All-purpose flour for dusting
- 1 batch Shortcut Danish Pastry (recipe follows)
For the icing:
- 1 batch Five-Finger Icing (recipe follows)
Prepare the almond filling: Combine all the filling ingredients, reserving a little of the beaten egg white for brushing the dough, in a medium bowl. Use a handheld mixer to beat everything together until smooth. Prepare the dough: Lightly flour a work surface. Divide the dough in half. Roll out each half to a long, narrow rectangle of dough, 6 x 24 inches. Spread 1/2 cup of the filling in an even strip down the center. Fold in 1 side lengthwise, over the filling.
Using a pastry brush, slick the entire open border of dough with the reserved beaten egg white, on both the long end and the 2 short ends. Fold the second long side over the first toward the center. Pinch and press the seam tightly, sinking your fingertips into the pastry, all along the seam to create a tight seal. Remeasure the length of dough—if it’s shrunken a bit, gently press and stretch it back out to at least 24 inches. Form the strip of dough into an oval.
Insert 1 end of the pastry into the other by at least 1 1/2 inches, then tightly pinch and press the seam together. Flip the oval over, seam-side down, onto the prepared baking sheet. Cover loosely with plastic wrap. Repeat the filling and shaping with the second portion of dough. Allow the pastries to rise for 30 minutes, until slightly puffy. Brush all over with beaten egg white.
Bake until golden, about 25 minutes, rotating the baking sheets from front to back and top to bottom halfway through the baking time. As soon as the pans come out of the oven and the pastries are piping hot, do something that seems a little crazy: Compress each pastry slightly by using the baking pan with the other pastry on it—just set the pan on top of the pastry and press gently to eliminate the air pocket between the pastry and filling. Allow the pastries to cool completely on the pans set over wire racks before icing.
Ice the kringles with Five-Finger Icing. Let the icing dry before slicing and serving.
Note: My favorite kringle has an almond filling as seen here, but mix it up by using any store-bought jam, lemon curd, or prepared fruit filling you like—you’ll need 1 cup of filling to make 2 pastries.
Shortcut Danish Pastry
The long-game version of Danish pastry involves making a yeast dough and a “butter block”—a plank created from mashed-together sticks, and then wrapping the butter in dough before a rolling and folding process creates loads of whisper-thin layers of butter and dough. It’s time-consuming, not foolproof, and honestly, I don’t find this traditional version any more satisfying than a shortcut version once everything is shaped, baked, and filled. When I learned Scandinavian baking goddess and Minnesotan Beatrice Ojakangas swears by a shortcut recipe and claims no home baker in Denmark does it any other way, I was sold.Making laminated dough—shortcut or not—might seem a bit intimidating at first. But look at it this way: with this method, it’s not all that different from making a pie crust. You’ll just be rolling the dough out a few more times, and folding it between rollings. It’s pretty magical to see it transform from shaggy and crazy-looking to supple and silky, right before your eyes. And when you bake it, the puffed, golden, flaky results will blow minds and take names.
Makes 1 large braid, 2 kringles, or nine 5-inch Danish pastries
- 1 cup (128 grams) unbleached all-purpose flour, spooned and leveled, plus more for dusting
- 1 cup (128 grams) unbleached bread flour, spooned and leveled
- 3 tablespoons (38 grams) granulated sugar
- 2 teaspoons instant yeast
- 3/4 teaspoon fine sea salt
- 1 cup (225 grams) cold unsalted butter, cut into 1/2-inch cubes
- 1/3 cup (75 grams) cold whole milk
- 1 large egg, cold
In a medium bowl, whisk together the milk and egg. Dump the flour mixture into the bowl. Use a flexible spatula to gently stir the dough until nearly all the flour is moistened. Use your hand to quickly knead the dough just a few times in the bowl to bring it all together into a shaggy mass. There will lots of large chunks of butter still visible in the dough.
Line a work surface with plastic wrap. Turn out the dough onto the plastic and pat into a rectangle. Wrap the dough tightly. Refrigerate for at least 4 hours, or up to 2 days.
Lightly flour a work surface and rolling pin. Roll the dough out to a rough rectangle, 8 x 15 inches. Fold the rectangle into thirds toward the center, like a letter. Rotate the dough 90 degrees. Roll it out again, 8 x 15 inches. Fold into thirds. (This completes 2 turns of the dough. It will look a bit knobby and cracked at this stage, don’t worry.) Wrap the dough in plastic wrap. Chill for at least 20 minutes. Repeat the rolling, folding, and chilling process twice more until you’ve completed 6 turns in all. After the last round of chilling, shape and bake according to your recipe, or wrap tightly in a double layer of clean plastic wrap and refrigerate for up to 3 days, or freeze for up to 2 months.
Five-Finger Icing
This is a drippy white finishing icing for all manner of pastries, coffee break treats, cookies, and more. Called five-finger icing because so many old-school bakeries use a gloved hand to artfully drizzle it over baked goods, this topping sets up with a firm, matte surface, making anything it touches irresistible.Makes about 1/2 cup icing
- 1 cup (120 grams) confectioners’ sugar
- Pinch of fine sea salt
- 4 teaspoons water
- 1/2 teaspoon pure vanilla extract, or a squeeze of lemon juice (optional)
All recipes reprinted with permission from “Midwest Made,” copyright 2019 by Shauna Sever, Running Press.