This No-Bake Oreo Cheesecake Practically Makes Itself

This No-Bake Oreo Cheesecake Practically Makes Itself
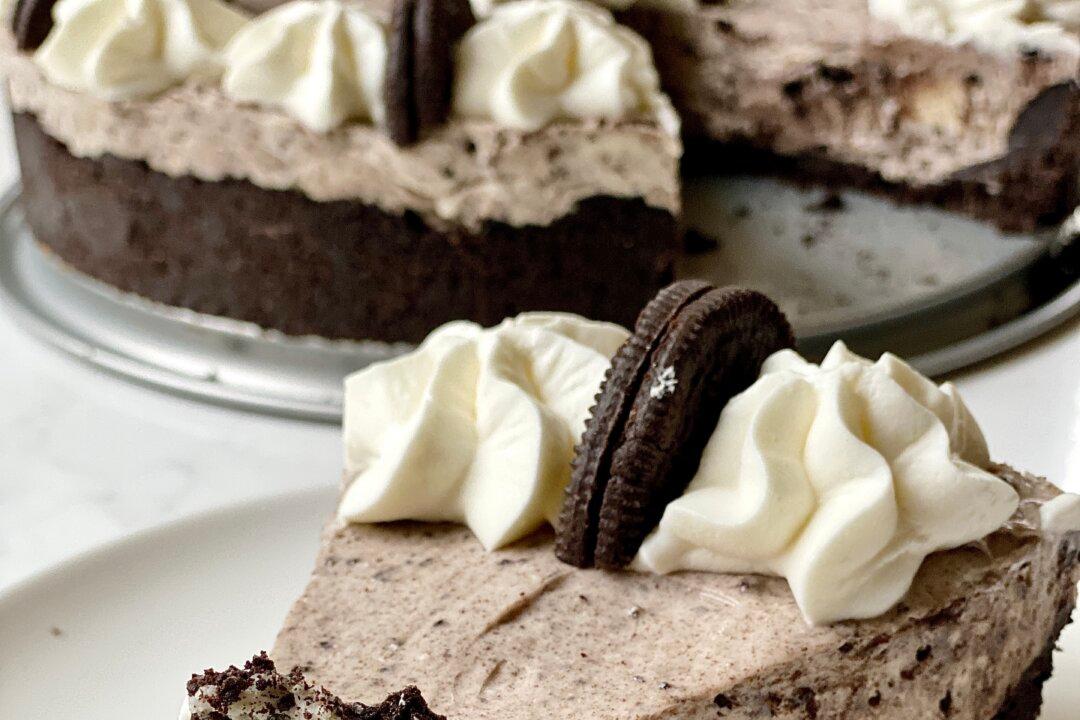
This cookies-and-cream no-bake cheesecake with an Oreo crumb crust takes some planning—but little work. Kelli Foster/TNS
Updated:

If you love the decadence of cheesecake, but without all the work, it’s time to give no-bake cheesecake a try. This recipe for a no-bake Oreo cheesecake (also called Oreo pie), made with a chocolatey Oreo crumb crust, cookies-and-cream cheesecake filling, and pillowy whipped cream and crunchy Oreo cookies on top, is summer’s simplest make-ahead dessert.
What You'll Need

Cream cheese: Full-fat cream cheese gives this no-bake cheesecake its rich texture. Softening the cream cheese first, and then beating until lightened makes it easier to fold in the whipped cream.
Oreo sandwich cookies: You’ll need an entire family-size package of Oreo cookies for this cheesecake. They’re used in every layer—the crust, filling, and garnish.
Story continues below advertisement
Heavy cream: Whipped cream made with cold heavy cream, powdered sugar, and vanilla extract serves two purposes: It lightens the cream cheese filling and garnishes the top of the cheesecake. You can substitute thawed Cool Whip in a pinch.

Why Is My No-Bake Cheesecake Not Firming Up?

If you stopped short of whipping heavy cream to stiff peaks, your no-bake cheesecake may not have the structure it needs to firm up. Make sure that the whipped cream forms thick, fluffy peaks.

No-bake cheesecakes must be chilled for at least six hours or, better yet, overnight to give it enough time to firm up for perfectly sliceable portions.

Why Is My No-Bake Cheesecake So Grainy?

No-bake cheesecakes are not the kind of dessert you can make at the last minute. While they are quick to make, they require at least six hours of chill time in the fridge (extra points if you can chill the cheesecake overnight).

If your no-bake cheesecake has a grainy texture, it’s likely that you tried to rush the process by chilling the cheesecake in the freezer. Next time, plan ahead and chill the cheesecake slowly in the refrigerator.

No-Bake Oreo Cheesecake

Makes 1 (9-inch) cheesecake; serves 8 to 10

  • 16 ounces cream cheese
  • Cooking spray
  • 6 tablespoons unsalted butter
  • 45 Oreo sandwich cookies (from an 18.12-ounce family-size package), divided
  • 1/2 teaspoon kosher salt, divided
  • 1 1/2 cups cold heavy cream
  • 1 1/3 cups powdered sugar, divided
  • 2 teaspoons vanilla extract

1. Let 16 ounces cream cheese sit at room temperature until softened. Coat the bottom of a 9-inch springform pan or 9-inch deep-dish pie plate with cooking spray.

2. Place 6 tablespoons unsalted butter in a large microwave-safe bowl. Microwave on HIGH until melted, 40 to 60 seconds.

3. Break 30 of the Oreo cookies in half with your hands and place in the bowl of a food processor fitted with the blade attachment. Pulse until fine crumbs form, 10 to 12 (1-second) pulses; you should have 2 3/4 cups crumbs. (Alternatively, place the cookies in a sealed zip-top bag and crush with a rolling pin into fine crumbs.)

4. Drizzle the butter over the cookie crumbs (reserve the bowl). Add 1/4 teaspoon of the kosher salt. Pulse until it resembles wet sand and holds together when squeezed, about 5 (1-second) pulses. (If making by hand, transfer the crumbs to a medium bowl and add the melted butter and salt. Stir with a wooden spoon until the mixture resembles wet sand and holds together when squeezed.)

5. Transfer the Oreo mixture into the springform pan or pie plate and press in with your hands until it covers the bottom and goes up the sides about 1/2 inch or all the way up the sides of the pie plate. Refrigerate while you make the filling.

6. Break 10 of the Oreo cookies in half with your hands and place in the food processor (no need to wipe out). Pulse until coarsely chopped, 5 to 6 (1-second) pulses; you should have 1 1/2 cups crumbs. (Alternatively, place the cookies in the sealed zip-top bag and crush with the rolling pin into coarse crumbs.)

7. Place 1 1/2 cups cold heavy cream in the bowl of a stand mixer (or large bowl if using an electric hand mixer). Beat with the whisk attachment on medium speed until soft peaks form, 2 to 3 minutes. Add 1/3 cup of the powdered sugar and continue to beat until stiff peaks form, 1 to 2 minutes more; you should have about 3 1/2 cups whipped cream. Transfer the whipped cream to a bowl.

8. Place the cream cheese, remaining 1 cup powdered sugar, 2 teaspoons vanilla extract, and remaining 1/4 teaspoon kosher salt in the now-empty mixer bowl. Beat on medium speed with the paddle attachment until fluffy, using a flexible spatula to scrape down the sides of the bowl as needed, 4 to 5 minutes total.

9. Add 2 cups of the whipped cream and fold in with a flexible spatula until combined. Add the chopped Oreos and fold until just combined.

10. Transfer the filling into the crust and spread into an even layer. Cover with plastic wrap and refrigerate for at least 6 hours and up to 1 day. Transfer the remaining whipped cream to an airtight container and refrigerate until ready to serve.

11. When ready to serve, re-whisk the reserved whipped cream until it forms stiff peaks again if needed. Transfer to a piping bag fitted with a large star piping tip or spoon the whipped cream decoratively around the edge of the cheesecake. Use remaining Oreo cookies to garnish the cheesecake.

Recipe Notes

Storage: Refrigerate leftovers in an airtight container for up to four days. The crust will soften over time.
Cool Whip variation: Replace the 1 1/2 cups heavy cream and 1/3 cup of the powdered sugar with 1 (8-ounce container) thawed Cool Whip. Save 1 cup Cool Whip for garnish before folding the remaining into the cream cheese mixture. Nothing beats the flavor of homemade whipped cream for strawberry shortcake and ice cream sundaes, but for this no-bake cheesecake, Cool Whip is a smart shortcut.
Patty Catalano
Patty Catalano
Author
Patty Catalano is a contributor to TheKitchn.com, a nationally known blog for people who love food and home cooking. Submit any comments or questions to editorial@thekitchn.com. Copyright 2022 Apartment Therapy. Distributed by Tribune Content Agency, LLC.
Related Topics