Orange Creamsicle Dream Bars Will Have Everyone Fighting for Seconds

You can’t beat the sweet vanilla-orange combination.
Orange Creamsicle Dream Bars Will Have Everyone Fighting for Seconds
These no-bake bars mimic the classic creamsicle flavor. (Alex Lepe/TNS)
Updated:
0:00
Some of my most cherished summer memories were made at the community pool. As soon as we heard the jingle of the ice cream truck, my friends and I would abandon the pool for the parking lot. Some went for the Mario ice cream with the gumball nose and others for the patriotic popsicles. My go-to ice cream truck order was always an orange creamsicle ice cream bar. Even though it wasn’t shaped like a cartoon or studded with chocolate and candies, I stand by my choice even today.
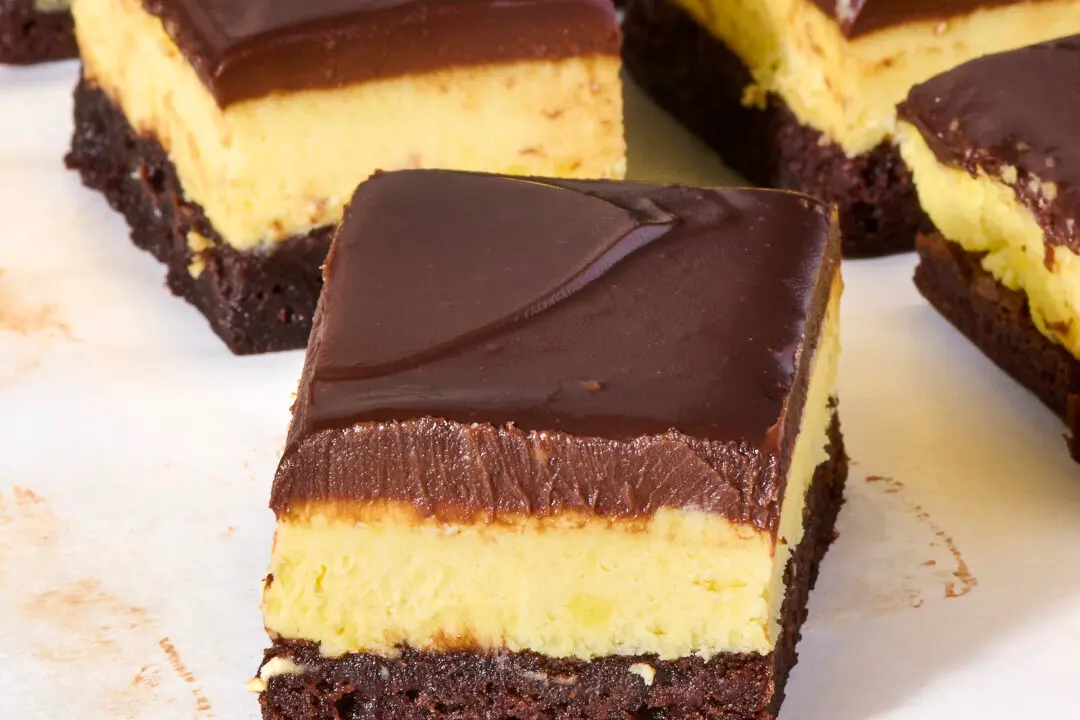
There’s a reason why that orange creamsicle flavor is so good in anything from a pudding cake to an orange mousse: You can’t beat the sweet vanilla-orange combination. I was inspired by my childhood favorite to make pretty layered bars. These orange creamsicle dream bars have four fun layers and require exactly zero time in the oven. Here’s how to make them.

Why You’ll Love It

  • They give ice cream truck vibes. If creamsicles were your go-to ice cream truck treat, these bars are for you. The orange-vanilla flavor is creamy, fresh, and fruity—basically everything we want in a summertime dessert.
  • It’s a make-ahead dessert everyone will love. These layered, no-bake bars are best when made in advance to give the layers time to chill and set.

Key Ingredients in Orange Creamsicle Dream Bars

  • Graham crackers: Crush these sweet crackers into crumbs and form into a tasty no-bake crust with butter and granulated sugar.
  • Orange: Add fresh orange zest and juice to the cream cheese mixture, but remember to save some for garnishing the bars.
  • Powdered orange gelatin: You’ll need just 2 tablespoons of powdered orange gelatin mix to get the fruit flavor. Add it directly to the cream cheese without dissolving it, but make sure to measure because adding too much will give that layer an unappealing bouncy consistency.
  • Vanilla extract: Orange creamsicle is a balance between bright orange and warm vanilla extract flavors. Use a full tablespoon of vanilla because chilling the bars will dull its flavor.
  • Cream cheese: Use a block of full-fat cream cheese for the best flavor and texture.
  • Whipped topping: Use this shortcut stand-in for freshly whipped cream to save some prep steps and extra bowls. Homemade whipped cream works, too, if you choose to make your own.

Orange Creamsicle Dream Bars

Serves 9
  • 8 ounces cream cheese
  • 8 tablespoons (1 stick) unsalted butter
  • 12 full-size graham crackers (about 6 1/2 ounces), or 1 1/2 cups graham cracker crumbs
  • 2 tablespoons granulated sugar
  • 1/2 teaspoon kosher salt, divided
  • 1 medium orange
  • 1/2 cup powdered sugar
  • 1 tablespoon vanilla extract
  • 1 (8-ounce) container thawed frozen whipped topping, such as Cool Whip, divided
  • 2 tablespoons powdered orange gelatin dessert mix (about 1 ounce)
1. Let 8 ounces cream cheese sit at room temperature until softened, about 45 minutes. (Alternatively, place the cream cheese in a small microwave-safe bowl, and microwave until very soft, 15 to 20 seconds.)

2. Line the bottom and sides of an 8-by-8-inch baking pan (about 2 inches tall) with two sheets of parchment paper, positioning them perpendicular to each other and making sure they are long enough to hang over all four sides by at least 1 inch to form a sling.

3. Melt 1 stick unsalted butter in a small microwave-safe bowl in 20-second bursts until mostly melted, about 40 seconds total (it will melt completely as it sits). (Alternatively, melt the butter in a small saucepan over medium heat.) Set aside to cool slightly.

4. Break 12 whole graham cracker sheets into rough pieces and place in a food processor fitted with a blade attachment. Add 2 tablespoons granulated sugar and 1/4 teaspoon of the kosher salt. Process until the crackers are the texture of sand, about 15 seconds. Add the melted butter and pulse to combine, 6 to 8 (1-second) pulses. (If using graham cracker crumbs, just stir the crumbs and butter together in a medium bowl.)

5. Transfer the mixture to the baking dish. Use the bottom of a measuring cup or your fingers to press the crumbs into an even layer, making sure to reach the edges and fill the corners. Refrigerate while you prepare the filling.

6. Wash and dry the food processor, blade, and butter bowl. Halve 1 medium orange. Finely grate the zest of one half into the food processor. Juice that half until you have 2 tablespoons, then add to the food processor. Reserve the remaining 1/2 orange for garnish.

7. Add the cream cheese, 1/2 cup powdered sugar, 1 tablespoon vanilla extract, and the remaining 1/4 teaspoon kosher salt to the food processor. Process until very smooth and lightened in texture, about 1 minute.

8. Transfer 1/2 cup of the cream cheese mixture to a medium bowl. Add 3/4 cup of the whipped topping and gently fold together with a flexible spatula. Spread over the crust in an even layer; reserve the bowl (no need to wash).

9. Add 2 tablespoons powdered orange gelatin mix to the remaining cream cheese mixture in the food processor. Process until completely incorporated, scraping the bottom and sides of the bowl as needed, 30 seconds to 1 minute total. Transfer to the now-empty bowl, add 3/4 cup of the whipped topping, and gently fold together with a flexible spatula until no streaks remain. Dollop into the baking pan and spread into an even layer.

10. Dollop the remaining 1 1/2 cups whipped topping over the orange layer and spread into an even layer. Cover and refrigerate until set, at least 4 hours or up to overnight.

11. Grasping the excess parchment paper, lift the slab out of the pan and place on a cutting board or serving platter. Cut a thin round off of the reserved 1/2 orange, then cut the round into 9 wedges. Finely grate the zest from the rest of the orange half over the top of the bars, then top with the orange wedges. Cut into 9 bars, wiping the knife between each cut to maintain the layered appearance.

Recipe Notes

  • Substitute 3 cups whipped cream in place of the Cool Whip.
  • Refrigerate leftovers in an airtight container for up to four days. The crust will soften over time.
Dear Readers: We would love to hear from you. What topics would you like to read about? Please send your feedback and tips to [email protected]
Patty Catalano is a contributor to TheKitchn.com, a nationally known blog for people who love food and home cooking. Submit any comments or questions to [email protected]. Copyright 2022 Apartment Therapy. Distributed by Tribune Content Agency, LLC.
Related Topics